


Custom Crafts Blog
How to Make Keychains That People Actually Want to Buy
Table of Contents
If you’ve ever thought about turning a simple craft into extra income, making keychains at home might be your perfect starting point. I stumbled into this world three years ago when I made a leather keychain for my sister’s birthday. She loved it so much that her coworkers started asking where she got it—and suddenly, I had five orders on my hands.
What started as a casual hobby has taught me that anyone can create unique, sellable keychains with minimal investment. The best part? You probably already have some materials at home.
Why Keychains Make Perfect DIY Projects
Keychains are ideal for beginners because they require:
Minimal materials and space
Quick completion time (most take 15-30 minutes)
Low startup costs
High profit margins when sold
Universal appeal as gifts or personal accessories
Essential Supplies to Get Started
Before diving into specific projects, gather these basic materials:
Hardware: Split rings, lobster clasps, jump rings, and keyring chains (available in bulk online for pennies each)
Tools: Pliers, scissors, hot glue gun, hole punch, and craft knife
Materials: The fun part—choose based on your style: leather scraps, polymer clay, beads, paracord, resin, felt, shrink plastic, wood slices, or fabric remnants.
10 Creative Keychain Ideas You Can Make Today
1. Beaded Keychains
Thread colorful beads onto wire or strong cord to create patterns. I’ve found that letter beads spelling names sell particularly well. Add a tassel at the end for extra flair. These take about 10 minutes and cost roughly $0.50 in materials.
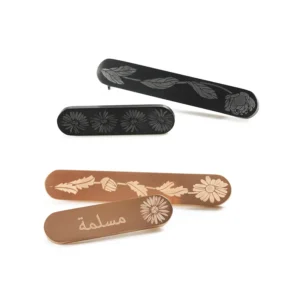
2. Leather Stamped Keychains
Cut leather into shapes (rectangles, circles, or custom designs), stamp initials or patterns, and finish with leather conditioner. The rustic look appeals to a wide audience, and small leather scraps are surprisingly affordable.
3. Paracord Keychains
Learn basic knots like the cobra weave or monkey fist. Paracord is durable, comes in endless colors, and creates a practical product. Outdoor enthusiasts especially appreciate these functional designs.
4. Resin Keychains
Pour resin into silicone molds with embedded items—dried flowers, glitter, tiny photos, or confetti. Once I started making custom resin keychains with preserved wedding flowers, I couldn’t keep up with orders. They’re surprisingly simple once you understand resin basics.
5. Macramé Keychains
Simple macramé knots create boho-style keychains that are incredibly trendy right now. Use cotton cord in natural tones or vibrant colors. These take practice but become quick once you master the basic square knot.
6. Polymer Clay Charms
Sculpt miniature objects, bake according to package directions, and attach to keyrings. Food-themed designs (tiny donuts, avocados, coffee cups) are consistently popular. Each one feels like a tiny sculpture project.
7. Tassel Keychains
Wrap embroidery floss or leather cord around cardboard, tie off, and cut. Add beads or charms for personality. I can make a dozen of these while watching a movie—they’re that straightforward.
8. Wristlet Keychains
Combine fabric, elastic, or ribbon into wrist-loop keychains. These became essential during the pandemic when hands-free carrying became important. They’re especially popular with moms and teachers.
9. Wood Slice Keychains
Purchase pre-drilled wood slices or cut your own from fallen branches. Paint designs, burn patterns with a wood-burning tool, or use decoupage. The natural element gives each piece unique character.
10. Bottle Cap Keychains
Flatten bottle caps, add resin or mod podge images inside, and attach findings. This recycled approach creates conversation starters and costs almost nothing.
My Biggest Lesson: Start Simple
When I first started, I attempted complex multi-material keychains that took an hour each. They were beautiful but not profitable at reasonable price points. The keychains that sold best were often the simplest—clean leather rectangles with gold foil initials, or minimalist beaded designs.
Focus on one or two styles first. Perfect your technique, understand your timing, and calculate your actual costs before expanding.
Turning Your Hobby Into Income
If you’re interested in selling your creations, here’s what actually works:
Pricing Formula: Material cost + (hourly wage × time spent) + platform fees = minimum price. Don’t undervalue your work—handmade items command premium pricing.
Where to Sell: Start with friends and family, then expand to local craft fairs, Etsy, Instagram shops, or local boutiques on consignment. I found the most success at farmers markets where customers could touch and see the quality.
Stand Out: Offer personalization (initials, custom colors), use quality hardware (cheap findings look cheap), and package beautifully—presentation matters more than you’d think.
Calculate Profit: Track every expense. My first batch of leather keychains cost $45 in materials and made 30 keychains. Sold at $12 each, that’s $360 in revenue minus $45 in materials and $30 in fair fees—a $285 profit for about 8 hours of work.
Tips for Professional-Looking Results
Consistency matters: Use templates to ensure uniform sizing. Customers notice when dimensions vary wildly.
Invest in good hardware: The split ring and clasp are what people interact with daily. Cheap hardware tarnishes and breaks, leading to unhappy customers.
Finish properly: Seal painted surfaces, condition leather, sand rough wood edges. These final touches separate amateur from professional work.
Test durability: Before selling, use your keychains yourself for a week. Do the beads hold? Does the clasp stay secure? Does color transfer to light-colored bags?
Materials I Wish I’d Known About Earlier
Shrink plastic (Shrinky Dinks) creates surprisingly durable, professional-looking charms. You can print or draw designs that shrink to a fraction of their size and thicken dramatically.
E6000 adhesive bonds almost anything permanently—far better than hot glue for items that will see daily use.
Jewelry-grade resin costs more but yellows less over time than craft resin. For items people will keep for years, it’s worth the investment.
The Reality Check
Not every keychain will sell. I’ve made batches that sat for months and designs that sold out in hours. Pay attention to what resonates. Take photos of items before selling them so you can recreate popular designs.
Also, be realistic about time. If a keychain takes two hours to make and requires specialized expensive materials, it may not be practical for selling—unless you’re targeting the luxury market.
Starting Today
Choose one technique that excites you. Buy minimal supplies—maybe $20 worth. Make five keychains. Give them to friends or list them online. The feedback you receive will guide your next steps far better than any amount of planning.
Making keychains at home combines creativity with practicality in a way few crafts do. Whether you’re looking to earn extra money or simply want a satisfying evening project, the barrier to entry is remarkably low. Start simple, stay consistent, and let your style develop naturally. You might be surprised at where this small craft takes you.
PRODUCT CATEGORIES
Do you want to have unique metal crafts?
Let's connect ASAP.
We are a professional manufacturer of custom metal crafts, we can create exquisite metal artworks for you according to your needs and preferences.