


Creating your own custom pins might seem like a task reserved for professional manufacturers, but with the right knowledge and tools, anyone can craft beautiful, durable pins from the comfort of their home workshop. Whether you’re looking to start a small business, create promotional items, or simply express your creativity, understanding the pin-making process opens up endless possibilities.
Understanding Different Types of Custom Pins
Before diving into the creation process, it’s essential to understand the various types of pins you can make. Enamel pins are among the most popular, featuring colorful designs filled with enamel paint and fired at high temperatures for durability. These pins offer vibrant colors and a professional finish that rivals commercially produced items.
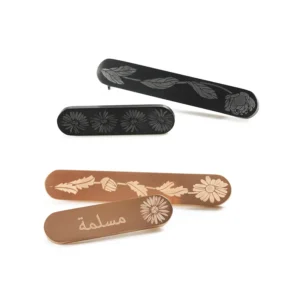
Metal pins without enamel provide a more subtle, elegant appearance. These can be crafted using techniques like etching, stamping, or laser cutting, depending on your available equipment and desired outcome. The raw metal finish appeals to those seeking a minimalist or industrial aesthetic.
Essential Materials and Tools for Pin Making
Success in pin making begins with having the right materials. You’ll need base metals such as brass, copper, or stainless steel, which serve as the foundation for your designs. The choice of metal affects both the final appearance and the manufacturing process.
For enamel pins, you’ll require enamel paints specifically designed for metalwork, along with a kiln or torch capable of reaching the necessary temperatures for proper curing. Safety equipment including protective eyewear, heat-resistant gloves, and proper ventilation cannot be overlooked.
Basic tools include metal cutting equipment (jeweler’s saw or laser cutter), files for smoothing edges, and polishing compounds for finishing. If you plan to create raised or recessed designs, you’ll also need stamping or etching equipment.
The Step-by-Step Process of Creating Metal Pins
The journey begins with design creation. Start by sketching your concept, keeping in mind that simpler designs often translate better to small pin formats. Once satisfied with your design, transfer it to your chosen metal using transfer paper or by directly etching the pattern.
Cutting comes next, requiring patience and precision. Whether using traditional hand tools or modern laser cutting equipment, maintaining clean, smooth edges is crucial for a professional appearance. Take your time during this phase, as rushing can result in jagged edges that are difficult to correct later.
After cutting, the metal requires thorough cleaning and preparation. Remove any oils, oxidation, or debris that could interfere with paint adhesion or finishing processes. This step significantly impacts the quality of your final product.
Mastering the Art of Lapel Pin Creation
Lapel pins require special attention to size and weight considerations. These accessories need to be substantial enough to make an impact while remaining comfortable to wear. The standard size ranges from half an inch to two inches, with thickness rarely exceeding 3mm to prevent excessive weight.
The backing mechanism deserves careful consideration. Butterfly clutches work well for most applications, while magnetic backs offer convenience for frequent removal. The choice depends on your intended use and target audience preferences.
Color selection plays a vital role in lapel pin appeal. Consider the environments where these pins will be worn and choose colors that complement both formal and casual attire. Subtle color schemes often prove more versatile than bold, contrasting combinations.
My Personal Journey Into Pin Making
My first attempt at creating custom pins came from necessity rather than hobby interest. I needed promotional items for a small event but found commercial options either too expensive or lacking in personalization. After researching the process, I decided to try making them myself using basic jewelry-making tools I already owned.
The initial results were far from perfect. My first batch had uneven edges, inconsistent enamel application, and several pins broke during the backing attachment process. However, each mistake taught valuable lessons about pressure control, temperature management, and the importance of proper preparation.
Through persistent practice and gradual equipment upgrades, I developed techniques that consistently produce professional-quality results. The most significant breakthrough came when I learned to control enamel flow during the firing process, preventing the bleeding and uneven coverage that plagued my early attempts.
Advanced Techniques for Professional Results
As your skills develop, consider incorporating advanced techniques that set your work apart from basic productions. Gradient coloring creates stunning visual effects by blending multiple enamel colors during the firing process. This technique requires precise timing and temperature control but produces results that command higher prices and greater appreciation.
Texture incorporation adds another dimension to your creations. Techniques such as sandblasting, acid etching, or mechanical texturing create surfaces that catch light differently and provide tactile interest. These methods work particularly well for pins intended as premium gifts or awards.
Multiple firing cycles allow for complex color layering and special effects. While this extends production time, the results justify the additional effort for high-value projects or personal satisfaction pieces.
Quality Control and Finishing Touches
Professional pin makers understand that quality control separates amateur work from commercial-grade products. Develop a systematic inspection process that examines every aspect of your pins before considering them complete.
Check for enamel consistency, ensuring smooth surfaces without pits, bubbles, or thin spots that could chip easily. Examine edge finishing, verifying that all cuts are clean and properly deburred. Test backing mechanisms to ensure secure attachment and smooth operation.
Final polishing brings out the metal’s natural luster and removes any fingerprints or handling marks acquired during production. This step transforms good pins into exceptional ones that reflect light beautifully and feel substantial in the hand.
Troubleshooting Common Pin Making Problems
Even experienced makers encounter challenges that require problem-solving skills. Enamel cracking typically results from thermal shock caused by rapid temperature changes. Prevent this by allowing gradual cooling after firing and avoiding exposure to cold surfaces while hot.
Backing attachment failures often stem from inadequate surface preparation or using inappropriate adhesives. Ensure metal surfaces are completely clean and slightly roughened to promote strong adhesion. Select adhesives specifically designed for metal-to-metal bonding rather than general-purpose options.
Color bleeding between enamel sections can ruin otherwise perfect pins. Create proper barriers using raised metal edges or allow sufficient drying time between color applications. Understanding enamel viscosity and flow characteristics helps prevent this frustrating issue.
Building Your Pin Making Skills
Continuous improvement comes through deliberate practice and willingness to experiment with new techniques. Start with simple, single-color designs to master basic processes before attempting complex, multi-colored creations.
Document your processes, including temperatures, timing, and material combinations that produce successful results. This documentation becomes invaluable when attempting to reproduce particular effects or troubleshoot problems.
Connect with other makers through online communities, local craft groups, or maker spaces. Sharing experiences and learning from others accelerates skill development and introduces new perspectives on familiar challenges.
Taking Your Pin Making to the Next Level
Once you’ve mastered basic techniques, consider expanding your capabilities with specialized equipment or advanced materials. Laser engraving adds precise detail impossible to achieve manually, while 3D printing enables complex backing designs or specialized jigs for consistent production.
Exploring alternative materials such as titanium, silver, or exotic alloys opens new creative possibilities while commanding premium prices for finished products. Each material presents unique working characteristics that expand your technical knowledge and artistic range.
Whether you’re creating pins for personal satisfaction, gift-giving, or commercial purposes, the skills you develop through hands-on experience will serve you well. The combination of technical precision and creative expression makes pin making a rewarding pursuit that continues to offer new challenges and opportunities for growth.